Adhoc Analysis Filter Conditions
By following this document user will know how to use Filter Conditions in Adhoc Analysis.
Prerequisites
-
For this example, the adhoc analysis is used Adhoc Analysis.adhoc.
-
Download the required sample files from the link adhocanalysisfilters.zip
-
Upload Adhoc Analysis.adhoc to the Adhoc Analysis section of the application.
-
Refer to this link for detailed steps on uploading files in the application.
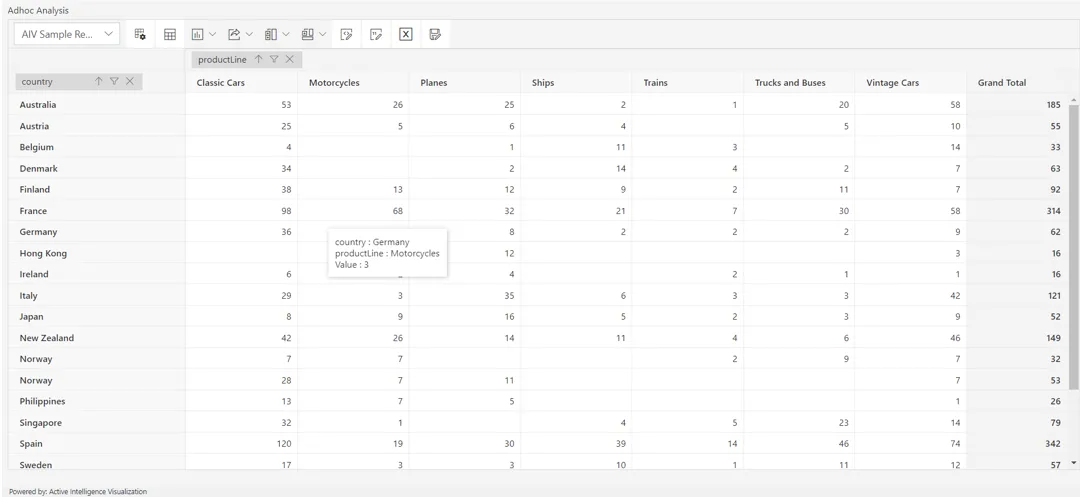
Steps to apply Filters in Adhoc Analysis
-
Go to Hamburger
 icon > Documents > Adhoc Analysis, then click on the list view
  icon to open the Analysis.
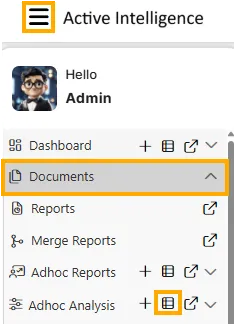
-
Double-click your file (for example, Adhoc Analysis) to open it.
-
Click the
 icon to display the available dataset fields. From here, you can modify the data used to build the analysis.
 -
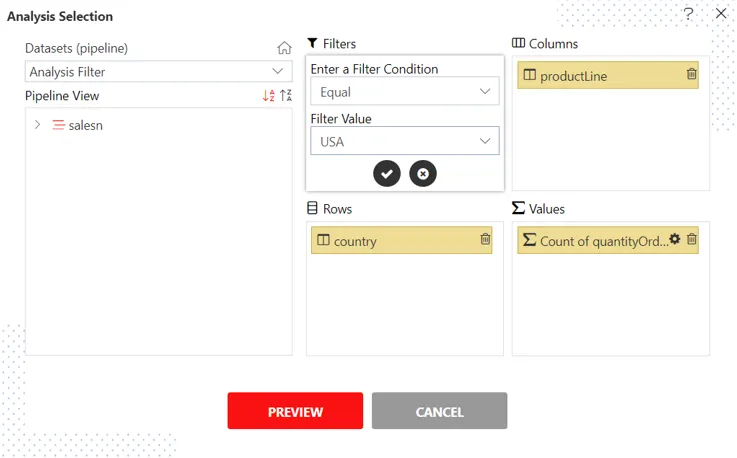
To apply a filter, drag and drop the field Years from the Dataset Columns panel into the Filters section.
Equal Condition
The Equal filter is used to find exact matches. This filter provides only a list box instead of a multi-select. For multiple values, use the IN condition.
-
Go to the settings icon at the Filters option and fill in the details:
-
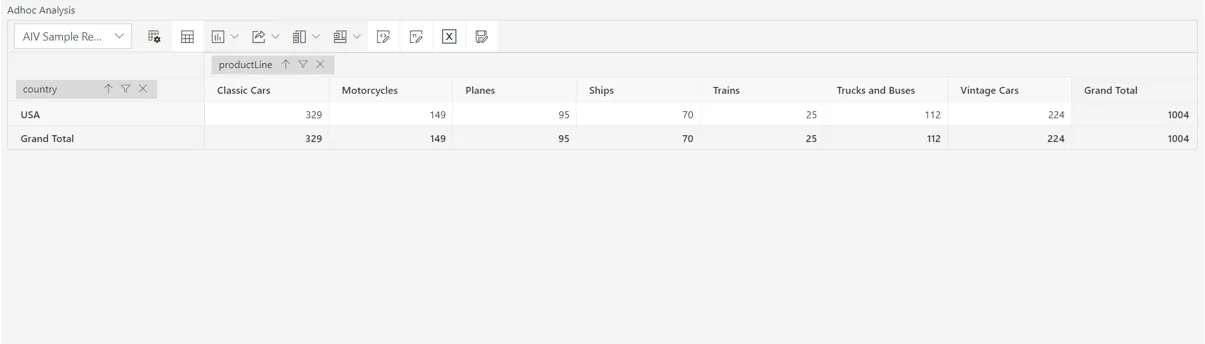
Click on the ✓ icon and then the PREVIEW button.
-
Upon clicking the CANCEL button, the window will look as follows:
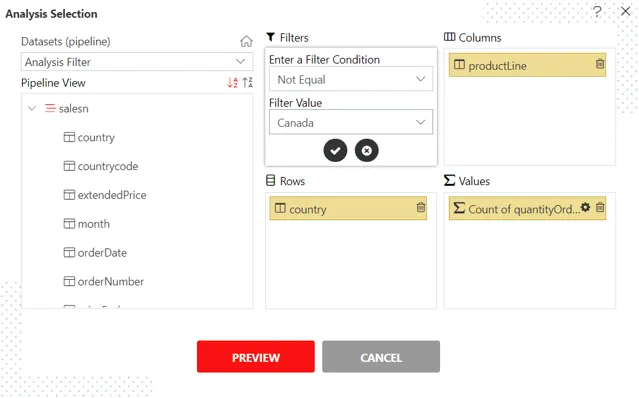
NOT Equal Condition
The NOT Equal filter works opposite to the Equal filter, excluding the condition and value applied and displaying the remaining values. It provides only a list box instead of a multi-select. For multiple values, use the NOT IN condition.
-
Go to the settings icon at the Filters option and fill in the details:
-
Click on the ✓ icon and then the PREVIEW button.
-
Upon clicking the CANCEL button, the window will look as follows:
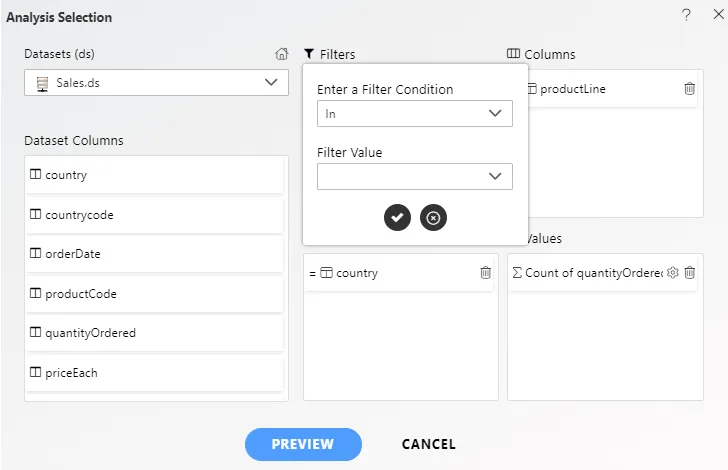
IN Condition
The IN condition allows users to check if an expression matches any value in a list of selected values. This condition provides a multi-select dropdown, enabling the selection of multiple values.
-
Click on the settings icon at the Filters option:
-
Click on the ✓ icon and then the PREVIEW button.
-
Upon clicking the CANCEL button, the window will look as follows:

NOT IN Condition
The NOT IN condition displays values that do not match the selected values, working opposite to the IN condition.
-
Go to the settings icon at the Filters option as in step 5 and fill in the details:

-
Click on the ✓ icon and then the PREVIEW button.
-
Upon clicking the CANCEL button, the window will look as follows:

- Results will be returned except for the selected values.
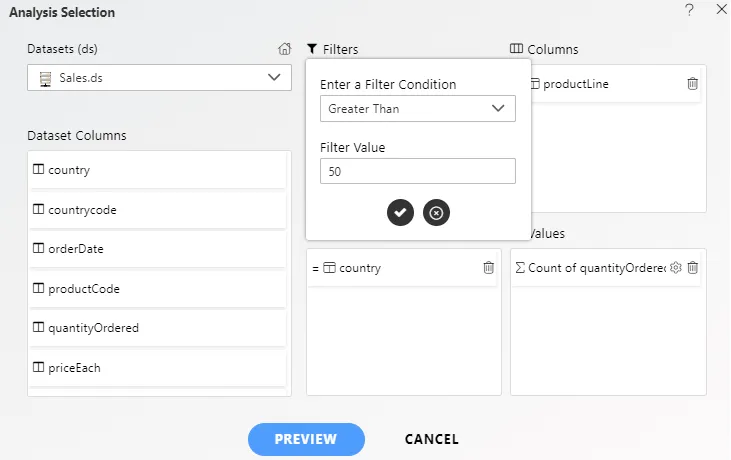
Greater Than Condition
The Greater Than condition is used to see values greater than the entered value. Users will have a blank text box to manually enter the required value.
-
Go to the settings icon at the Filters option and enter the filter values:
-
Click on the ✓ icon and then the PREVIEW button.
-
Upon clicking the CANCEL button, the window will look as follows:
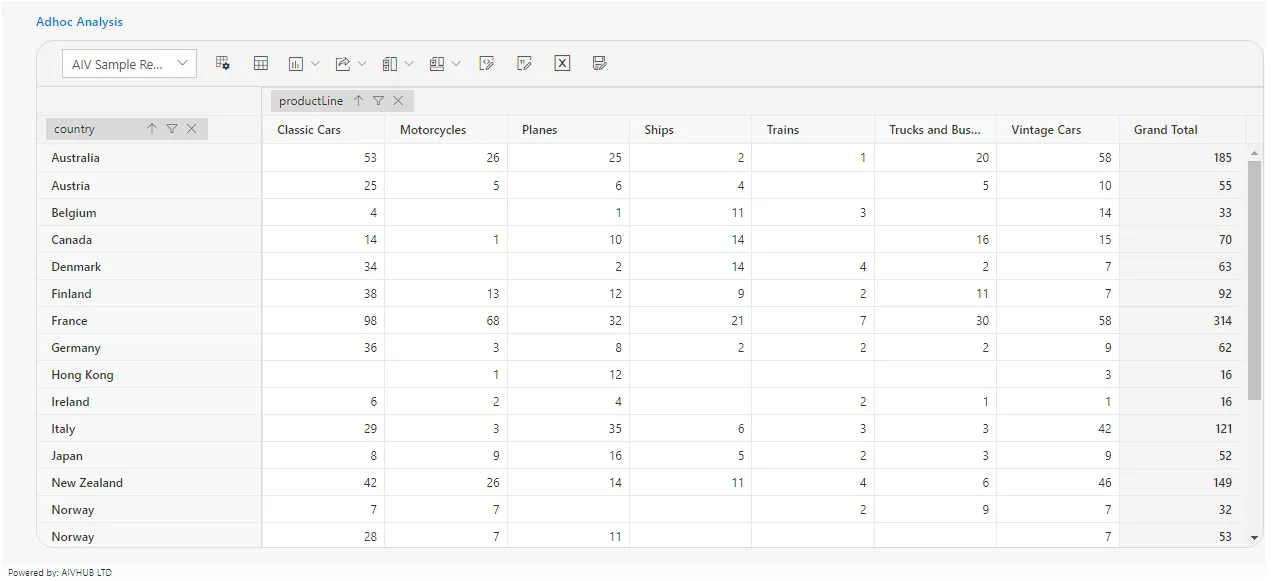
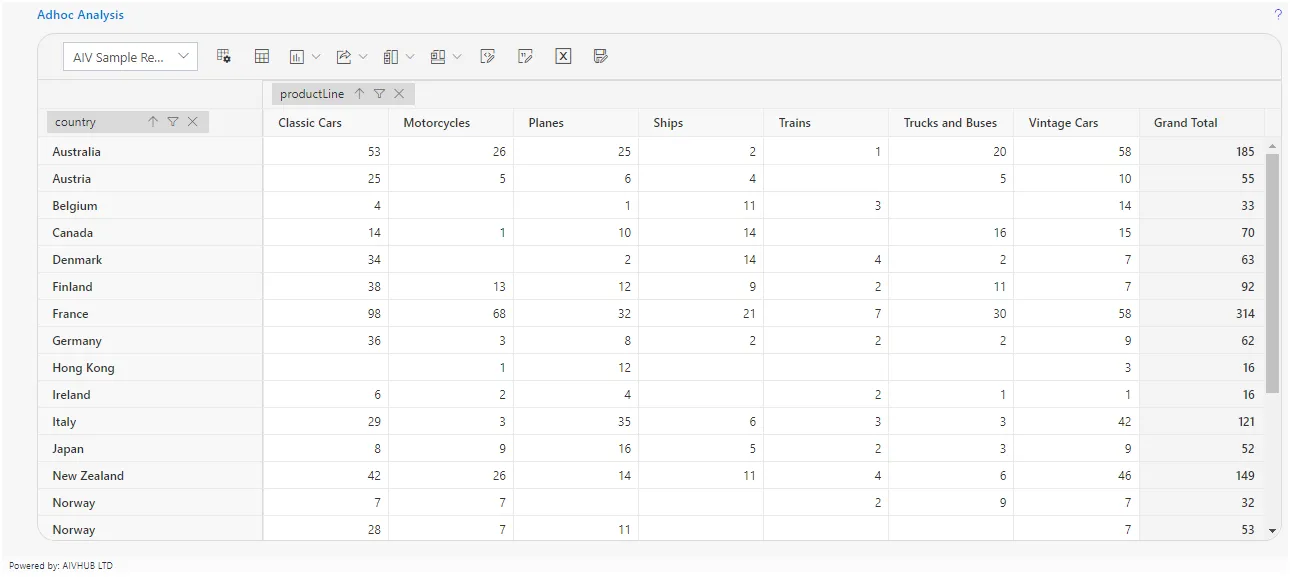
- Data displayed is greater than the applied condition value.
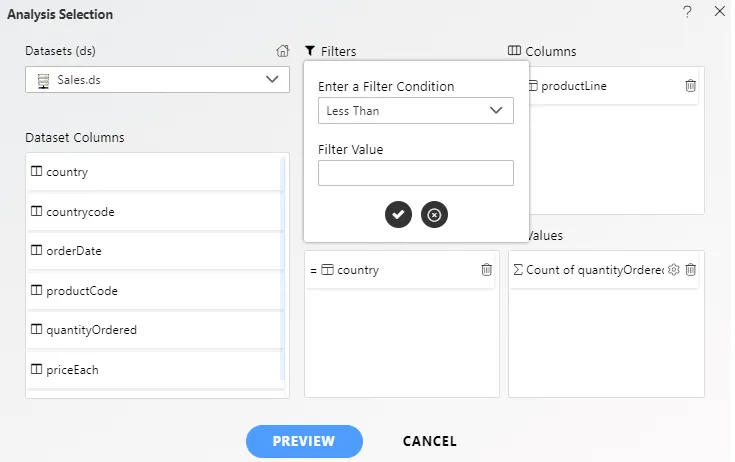
Less Than Condition
The Less Than condition is used to see values less than the entered value. Users will have a blank text box to manually enter the required value.
-
Go to the settings icon at the Filters option and enter the filter values:
-
Click on the ✓ icon and then the PREVIEW button.
-
Upon clicking the CANCEL button, the window will look as follows:
- Data displayed is less than the applied condition value.
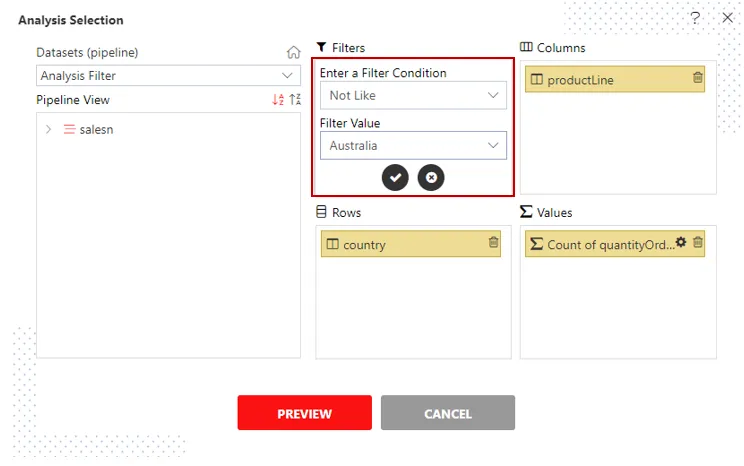
NOT LIKE Condition
The NOT LIKE condition works opposite to the LIKE condition, filtering out the selected value and showing remaining values.
-
Go to the settings icon at the Filters option, select the NOT LIKE condition, and fill in the details:
-
Click on the ✓ icon and then the PREVIEW button.
-
Upon clicking the CANCEL button, the window will look as follows:
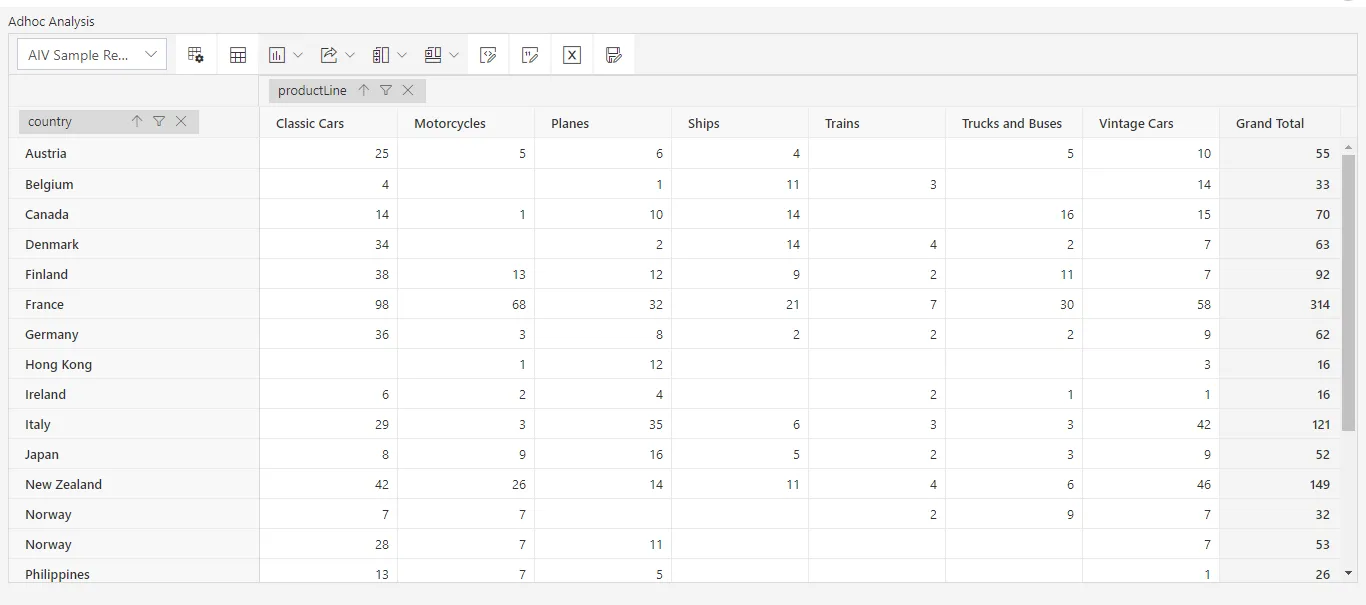
- Data for Australia will be filtered out as per the selected condition.
Greater Than or Equal To Condition
The Greater Than or Equal To condition works like the Greater Than condition, with the addition that it includes the selected value.
Less Than or Equal To Condition
The Less Than or Equal To condition works like the Less Than condition, with the addition that it includes the selected value.