Create a Dataset Using Excel
This guide walks you through creating a dataset in AIV using Excel files. Excel spreadsheets are widely used for tabular data, and AIV lets you use them directly as dataset sources.
What You’ll Learn
- What an Excel file is and when to use it
- Single-sheet vs multiple-sheet Excel files—when to use which, and when to show which example
- How to prepare and upload your Excel file
- Three ways to create a dataset: simple selection, custom query, or with parameters
What is Excel?
Microsoft Excel is a spreadsheet application that stores and organizes data in a table format. Excel files (.xlsx, .xls) are commonly used for reports, lists, and structured data that you can import into AIV.
| Characteristic | Description |
|---|---|
| Format | Binary (xlsx) or legacy (xls) |
| Structure | Worksheets with rows and columns |
| Use case | Reports, lists, data exchange |
Single sheet vs multiple sheets
Excel files can have one worksheet or several worksheets (tabs). How you create a dataset depends on which you have.
| Scenario | When to use | Example to show |
|---|---|---|
| Single sheet | Your Excel file has only one worksheet, or you care only about one tab. Use this when the file is one table (e.g. a list of marathon results). | Use a single-sheet example such as marathon.xlsx when you want to keep steps simple and focus on the three methods (Simple, Custom SQL, Parameters) without sheet selection. |
| Multiple sheets | Your Excel file has more than one worksheet and you need to choose a sheet, combine sheets, or reference a specific tab in a query. | Use a multiple-sheet example when you need to document how to pick a sheet from the file, or how to write SQL that references different sheets (e.g. SELECT * FROM [Sheet1$] vs [Sales$]). |
In this guide: The steps use a single-sheet example (marathon.xlsx) so you can follow one clear path. If your file has multiple sheets, after selecting the file you will also choose which sheet to use (or write a query that targets a specific sheet); the rest of the flow (Simple, Custom SQL, Parameters) is the same.
Prerequisites
Before you begin, complete these steps:
- Download the sample file: excel.zip
- Extract the zip archive
- Upload
marathon.xlsxinto AIV
Need help uploading? See the Upload guide for instructions.
Steps to Create a Dataset Using Excel
Complete Step 1 (Navigate to the Dataset Section) and Step 2 (Create a New Dataset) from the Create Dataset guide, then choose one of the three methods below.
| Method | Best for |
|---|---|
| Method 1: Simple | Loading all Excel data with no changes |
| Method 2: Custom SQL Query | Filtering, selecting columns, or transforming data |
| Method 3: With Parameters | Letting users filter data at runtime (e.g., in dashboards) |
Method 1: Simple — Select File and Use Default Data
Use this method when you want to load all data from your Excel file without filtering or custom queries.
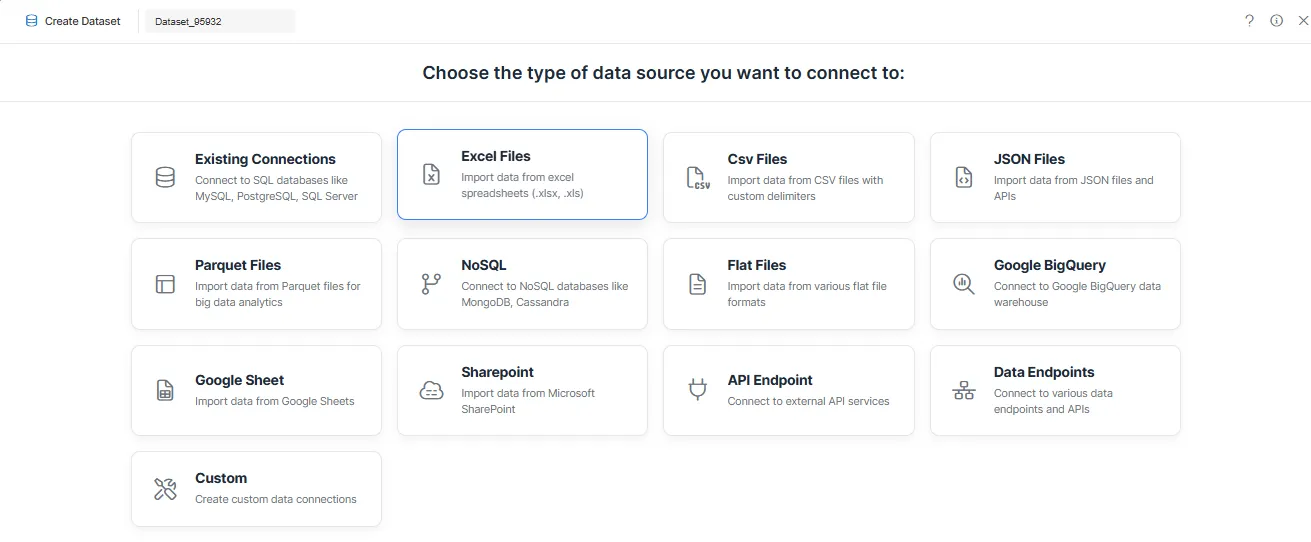
Step 1: Select Excel as the Data Source
-
Choose Excel Files as the data source type.
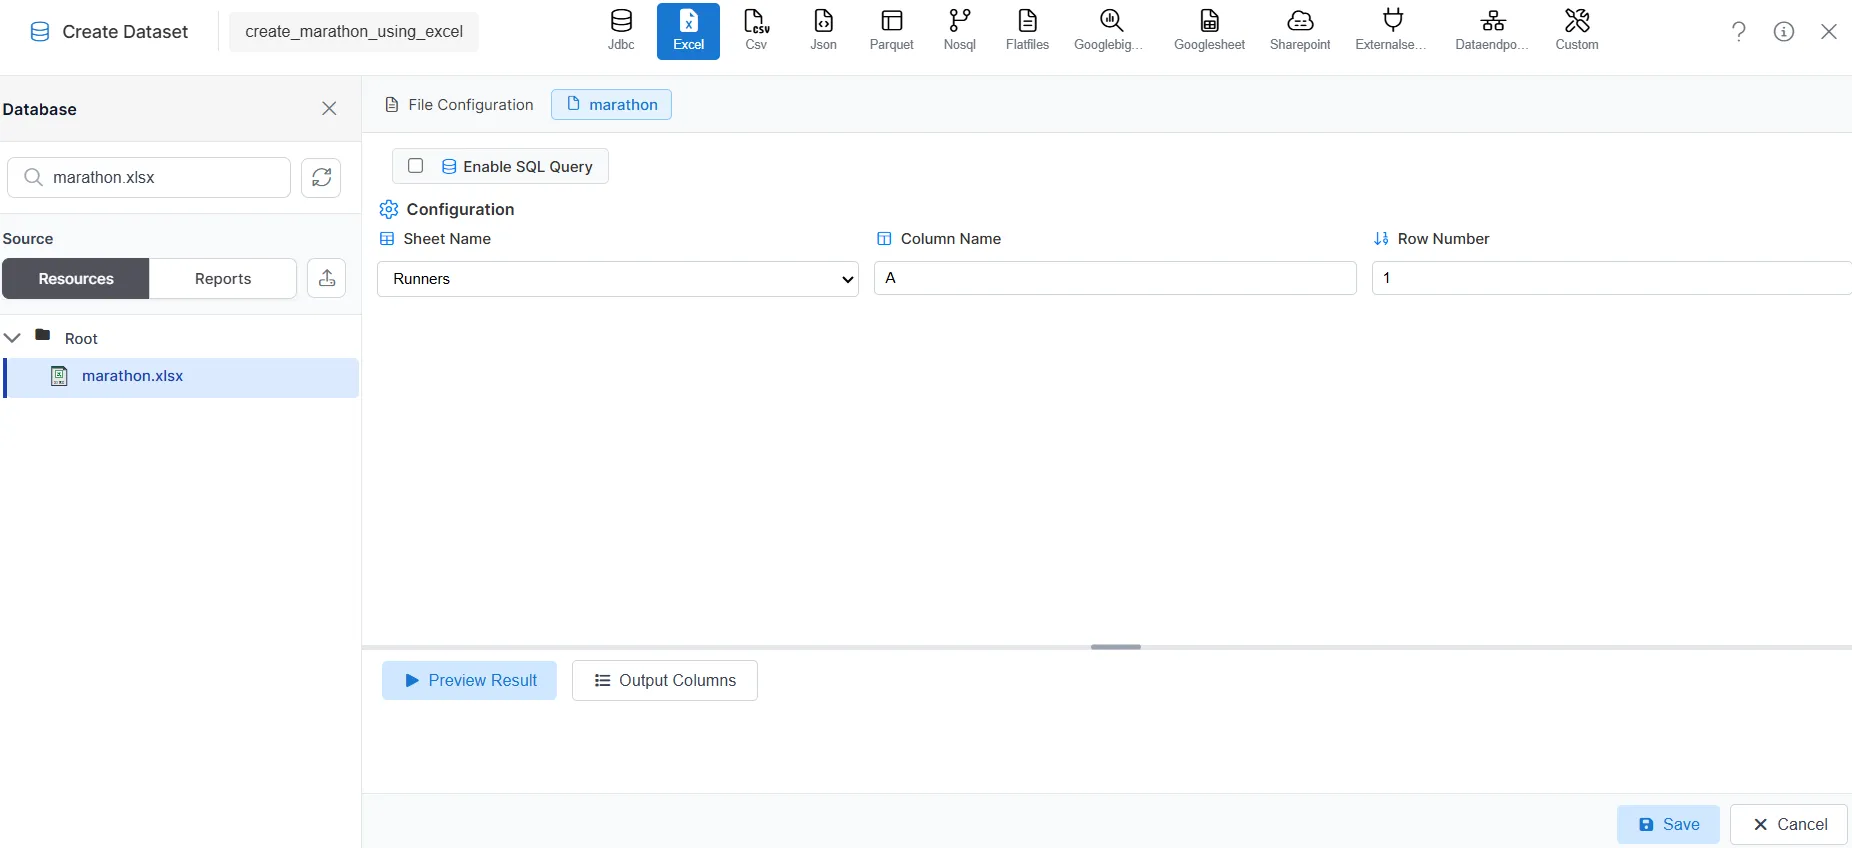
Step 2: Connection Selection
For details on file selection and tab options, see Connection Selection for Excel, CSV, and JSON.
If your Excel file has a single sheet:
- Click Select Existing Files.
- Search for your Excel file (for example,
marathon.xlsx). - Select the file from the list. With one sheet, the system uses that sheet by default.
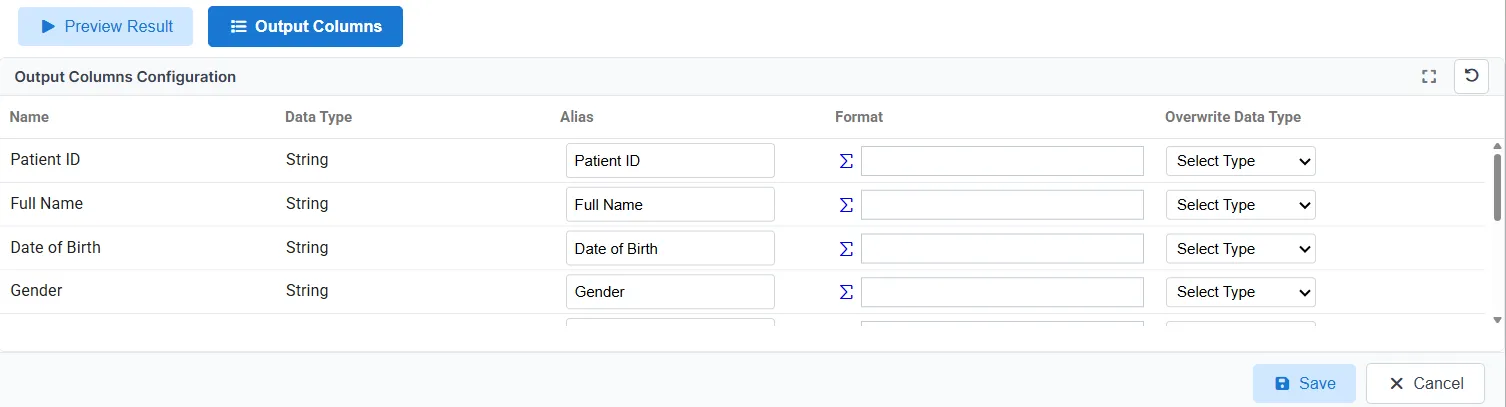
- Open the Output Columns tab to review column names and data types.
- Open the Preview Results tab to verify the data.
If your Excel file has multiple sheets:
- Click Select Existing Files.
- Search for your Excel file and select it from the list.
- Choose the sheet (worksheet) you want to use from the file—e.g. Sheet1, Sales, Summary. The dataset will use only the selected sheet.
- Open the Output Columns tab to review column names and data types for that sheet.
- Open the Preview Results tab to verify the data.
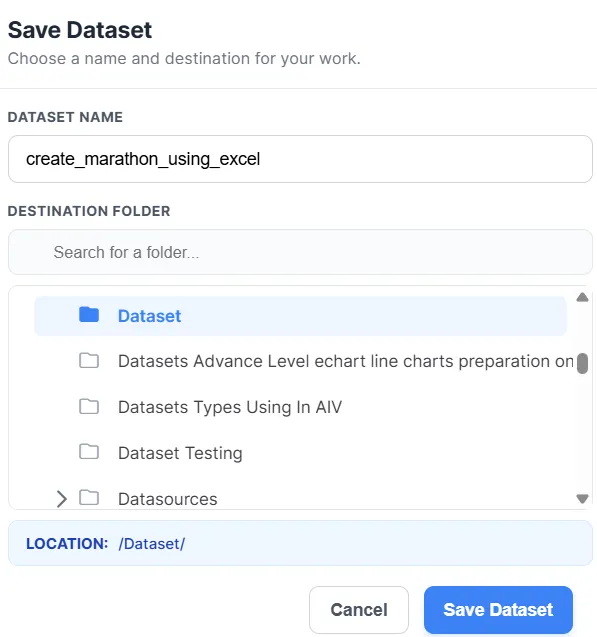
Step 3: Save Dataset
-
Click Save.
-
In the Save Dataset dialog, optionally rename the dataset and select the destination folder.
-
Click Save Dataset to confirm.
Step 4: View Your Dataset
-
Go to the Dataset Grid view.
-
Search for your dataset by name.
-
Your dataset is now available for use in dashboards, reports, and visualizations.

Method 2: Custom SQL Query
Use this method when you need to filter, transform, or select specific columns using a custom SQL query.
Step 1: Select Excel as the Data Source
Same as Method 1: Simple. Choose Excel Files as the data source type.
Step 2: Connection Selection
Single-sheet file: Click Select Existing Files, search for your file (e.g. marathon.xlsx), and select it. The default sheet is used.
Multiple-sheet file: Select the file, then choose which sheet to use. In the SQL query you can reference that sheet (e.g. [SheetName$]).
-
Click Select Existing Files and select your Excel file (and sheet, if the file has multiple sheets).
-
Enable SQL Query—the system generates a base query automatically.
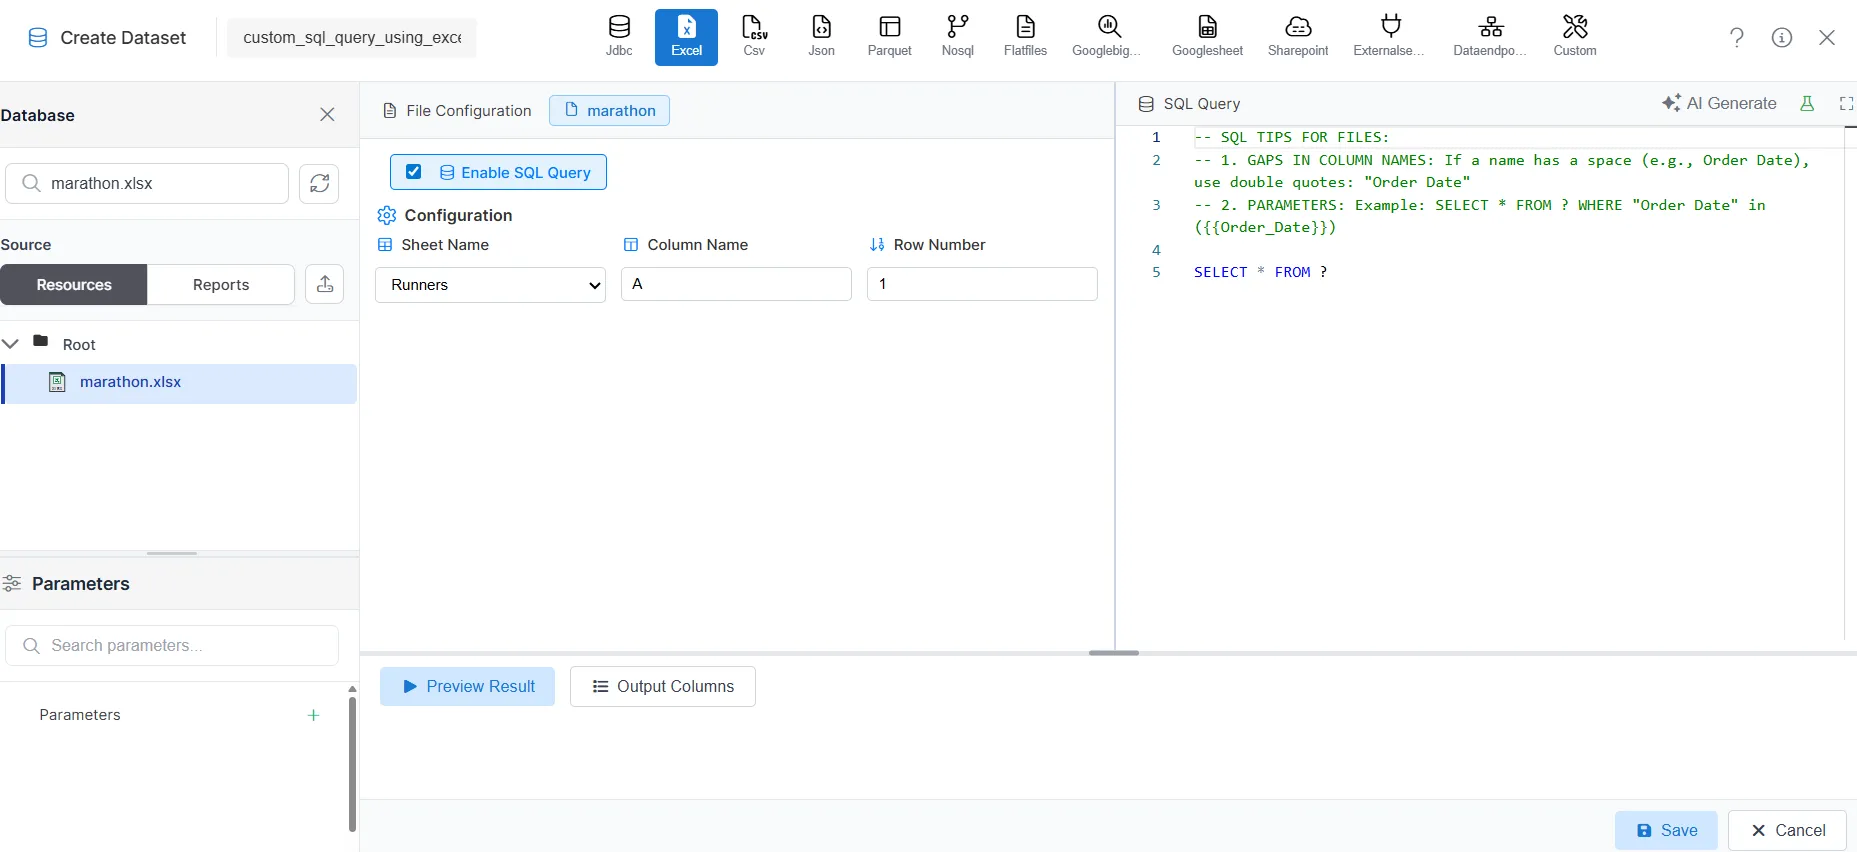
-
Modify the query to filter columns, add conditions, or transform data as needed. For multiple-sheet files, the query typically references the chosen sheet (e.g.
SELECT * FROM [Sales$]). -
Open the Output Columns tab to review column names and data types.
-
Open the Preview Results tab to verify the query output.
Step 3: Save Dataset
Same as Method 1: Save Dataset: Click Save, optionally rename and select the folder in the dialog, then click Save Dataset to confirm.
Step 4: View Your Dataset
Same as Method 1: View Dataset. Go to the Dataset Grid view and search for your dataset. Your dataset is now ready for use in dashboards and reports.
Method 3: With Parameters (Dynamic Filtering)
Use this method when you want users to filter data at runtime (e.g., by category, region, or date range).
Step 1: Select Excel as the Data Source
Same as Method 1: Simple. Choose Excel Files as the data source type.
Step 2: Connection Selection
Same as Method 2: Connection Selection. For a single-sheet file, select the file and enable SQL Query. For a multiple-sheet file, select the file, choose the sheet, then enable SQL Query.
Step 3: Add Parameters to the Query
-
Update the SQL query to include a parameter placeholder:
SELECT * FROM marathon WHERE Category IN ({{Category}}) -
Click Preview Results.
-
When prompted, enter a value (for example,
Running) for the parameter. -
Click Submit to view the filtered data.
-
Verify the output in Preview Results.
Step 4: Save Dataset
Same as Method 1: Save Dataset. Click Save, optionally rename and select the folder in the dialog, then click Save Dataset to confirm.
Step 5: View Your Dataset
Same as Method 1: View Dataset. Go to the Dataset Grid view and search for your dataset. When used in dashboards or reports, users will be prompted to enter parameter values to filter the data dynamically.
Related Guides
Explore other ways to create datasets in AIV:
| Data Source | Guide |
|---|---|
| Drag & drop | Create Dataset |
| CSV | Dataset using CSV |
| JSON | Dataset using JSON |
| Parquet | Dataset using Parquet |
| NoSQL | Dataset using NoSQL |
| Flat files | Dataset using Flat files |
| Google BigQuery | Dataset using Google BigQuery |
| Google Sheet | Dataset using Google Sheet |
| External sources | Dataset using External sources |
| Stored Procedure | Dataset using Stored Procedure |
| View | Dataset using View |