Introduction
What is Pipeline?
-
The pipeline is a new type of dataset added to the AIV Application. Users can define relationships between different datasets and as well as tables with user-friendly UI. With Pipeline, no SQL knowledge is needed to provide join between tables and datasets available in AIV. Earlier, joining Tables to get combined data from various table users has to write SQL Queries and it requires a good understanding of SQL Queries to do so. One who knows how to write SQL Queries can only able to get data from sources so Business users are dependent on a person who knows SQL. It is no longer the case when you use Pipeline to fetch data and apply joins between tables with the drag and drop facility provided in Pipeline.
-
User can also provide joins between datasets that are already created in AIV
Prerequisites
The prerequisites for working with Pipeline Dataset in AIV include :
- Access to the AIV Application : Users must have access to the AIV Application to utilize the Pipeline Dataset feature.
- Understanding of Data Relationships : Users should have a basic understanding of data relationships and how different datasets or tables are related to each other.
- Familiarity with AIV Interface : Users should be familiar with navigating and using the AIV interface to create and manage datasets.
- Access to Relevant Data : Users must have access to the datasets or tables they intend to use in the pipeline.
- Proper Permissions: Users should have the necessary permissions to create, edit, and run pipelines within the AIV Application.
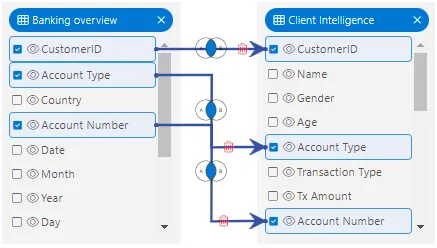
The image illustrates a sample view of a pipeline, showcasing interconnected nodes representing various datasets and tables. It demonstrates the relationships and joins established within the data pipeline, providing a visual representation of data flow and processing logic.
Here are some basic terminologies associated with pipelines :
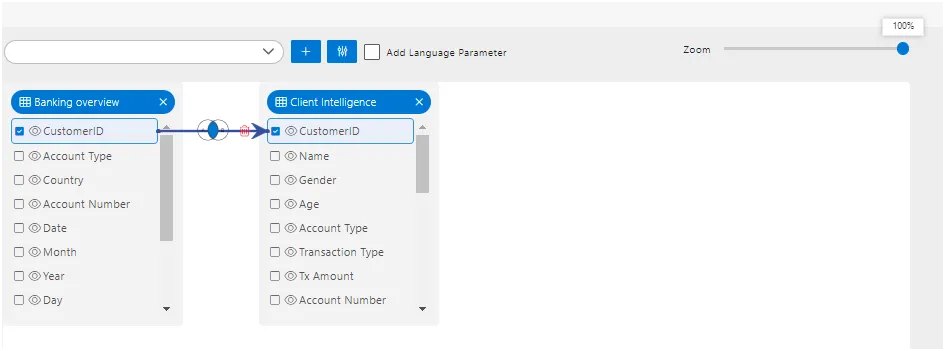
Node : A node represents a dataset or table within the pipeline.
Connection : Connections define the relationship between nodes, typically through joins or data transformations.
Join : Join operations combine data from multiple nodes based on specified conditions.
Data Source : The origin of data, which can be databases, files (CSV, JSON, Excel), external services, or other datasets.
Transformation : The process of modifying or manipulating data as it passes through the pipeline.
Pipeline View : The graphical representation of the pipeline structure, showing nodes and connections.
Parameters : Variables used to customize the behavior of the pipeline, such as filter criteria or data processing settings.
Output : The final result or destination of the pipeline, where processed data is stored or displayed.
you can see .pipeline extension file here.
Validation : The process of ensuring that data meets specified criteria or constraints, typically performed before or after transformations.
Execution : Running the pipeline to process data according to the defined structure and rules.
Monitoring : Tracking the performance and status of the pipeline, including data flow, errors, and completion status.
Schedule : Setting up automated or recurring execution of the pipeline at specified intervals.
Permissions : Controlling access to the pipeline, specifying who can view, edit, or execute it.
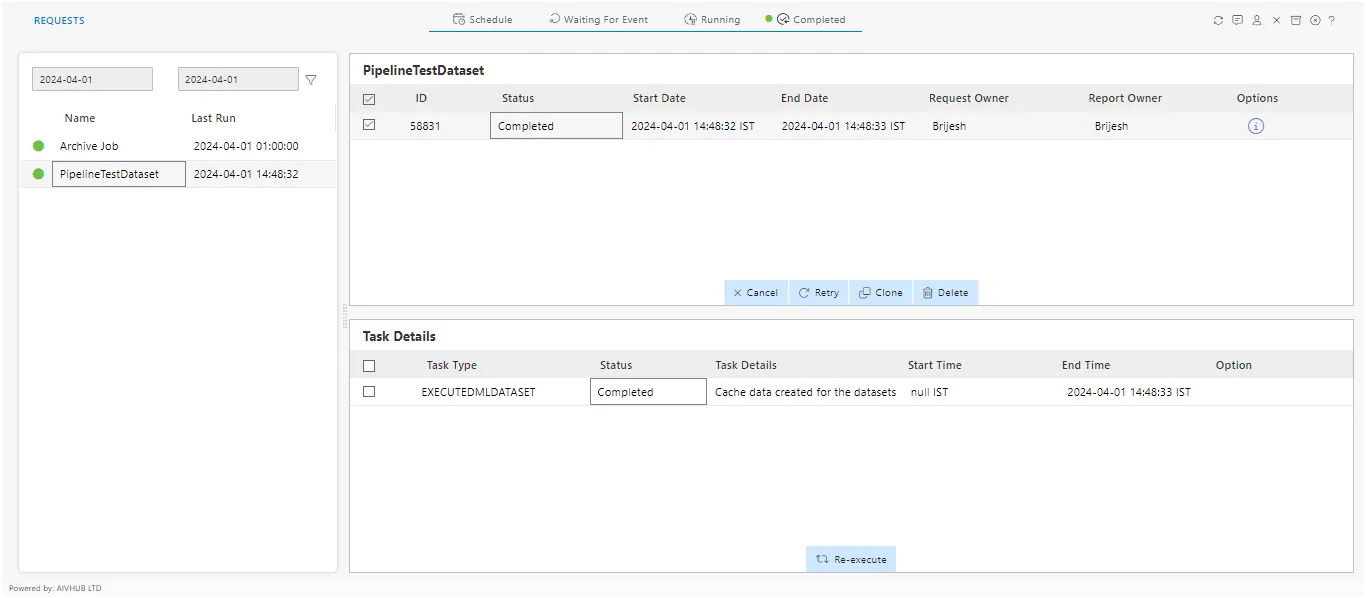
Logging : You can observe scheduling activities in the notification section of messages, while activities related to the pipeline schedule will be visible in the request section of AIV.
Error Handling: Dealing with unexpected issues or failures during pipeline execution, such as data inconsistencies or connectivity problems.In case of any further help, the user can contact support team of aiv.
How to implementation of pipeline in aiv.which is shown below.
Create Pipeline :
The pipeline can be created directly from the dataset section. In the dataset section, you’ll find the “Create Pipeline” option in the footer menu, as illustrated in the image below :
![]()
When you click on the “Create Pipeline” option, a new blank grid window will open, as shown in the image below :
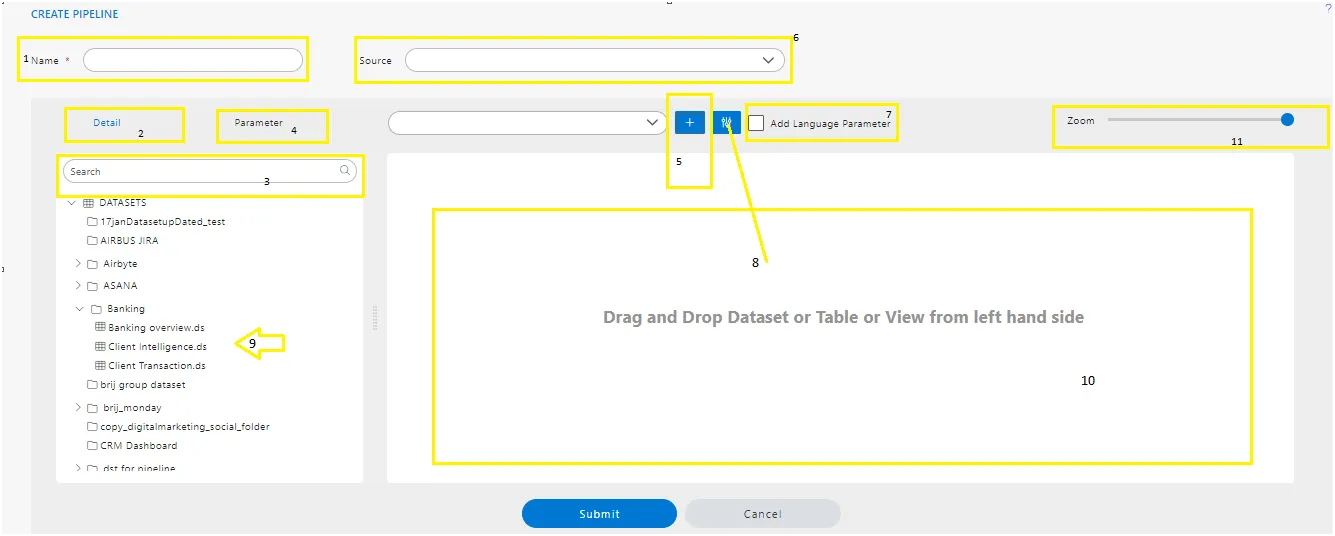
1. Pipeline Name.
- Users can provide a unique name for the pipeline in the “Name” text field.
2. Detail Tab.
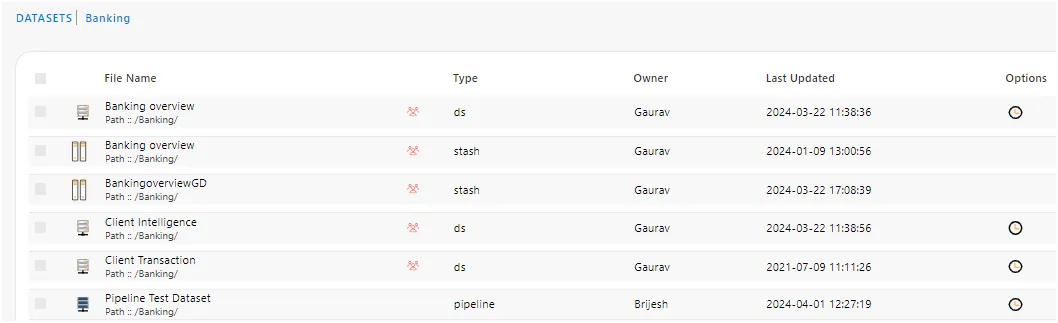
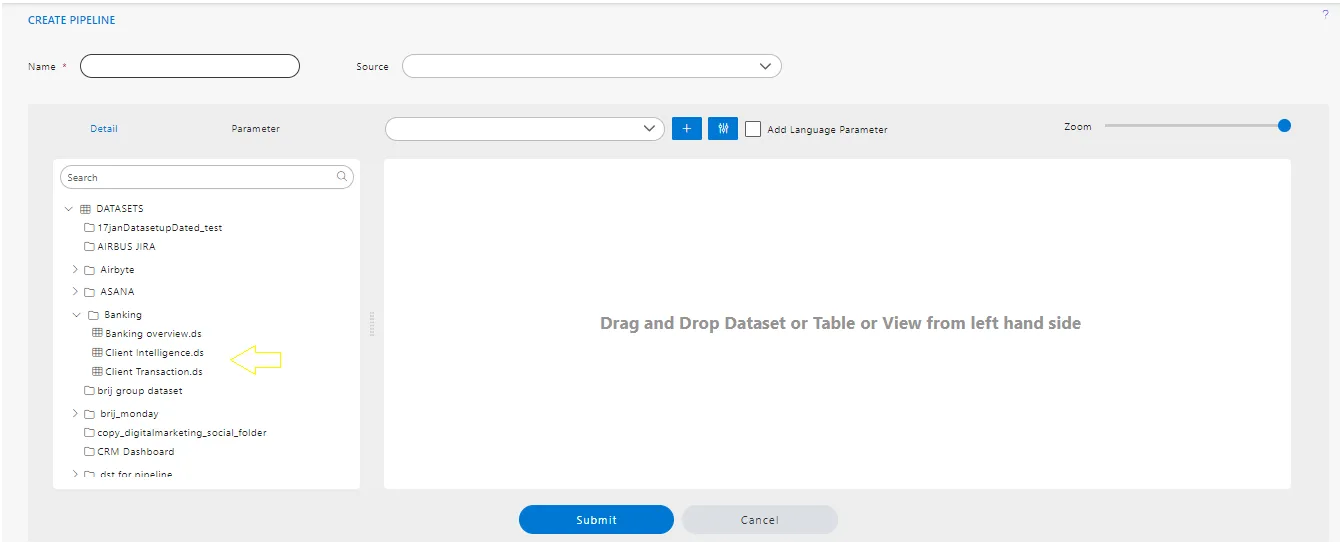
- The detail tab contains information on the list of datasets created or tables available for logged-in users.
3. Search Box.
- Users can find the required dataset, tables, or views by searching through this search box.
4. Parameter.
- Here, you can find the list of created parameters, including language parameters.
5. Add Parameter.
- Users can add parameters to the pipeline dataset by creating parameters from this section. This is the first step in using parameters in the pipeline dataset. Once the parameter is created here, users can utilize it in the pipeline later on.
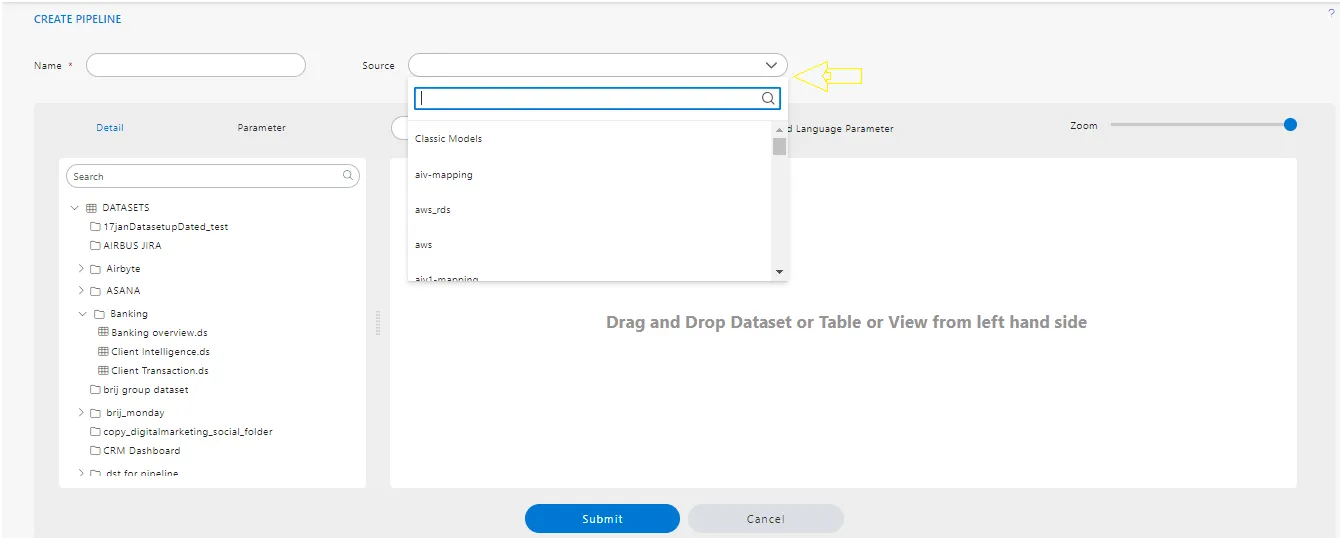
6. Source.
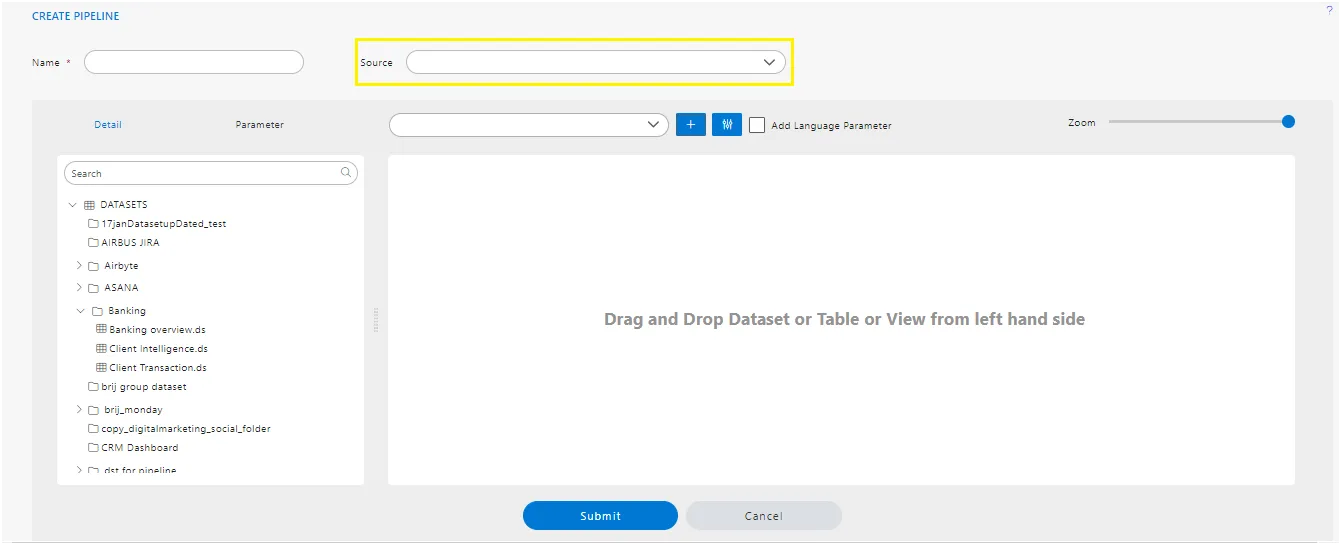
- By clicking on this Source drop-down, users can see a list of data sources available for logged-in users. They can select data sources to retrieve the list of tables and views from that data source.
- On the left-hand side, a detailed list of tables and views is displayed, as shown in the image below.
7. Add Language Parameter.
In AIV, users can add a Language Parameter by selecting the checkbox labeled “Add Language Parameter”. In the Language parameter, users have to utilize the Parameter dataset.
In the initial release, this feature is not functioning, It will be available in subsequent releases.
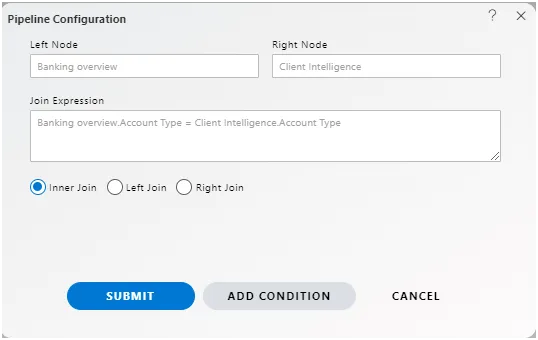
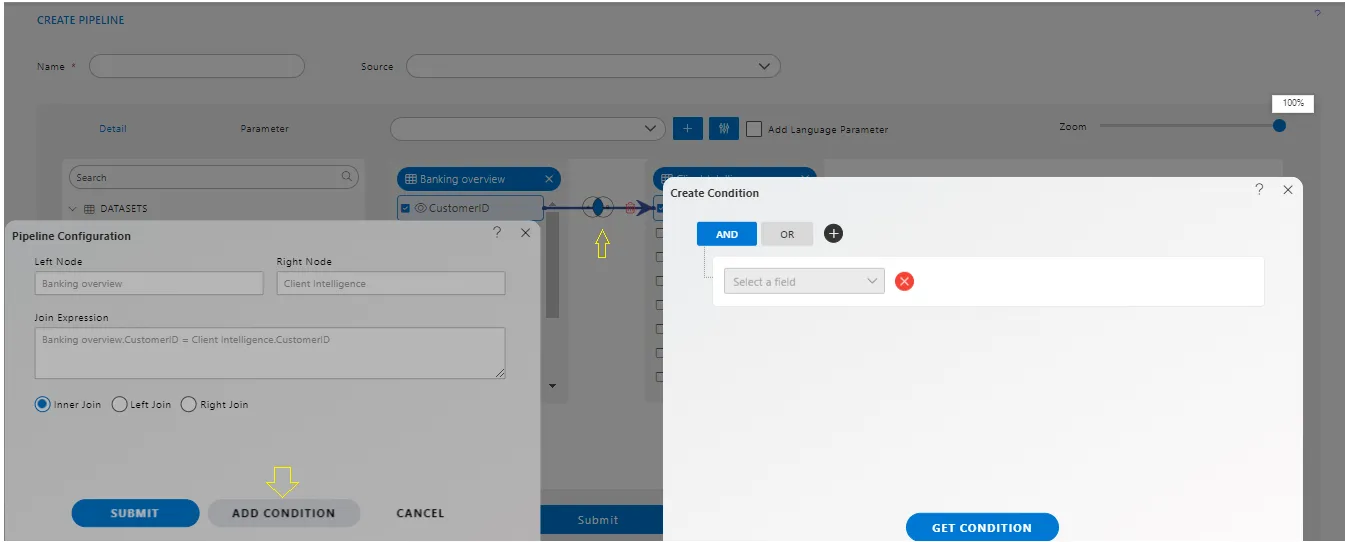
8. Add Condition.
-
Users can apply one or more conditions to filter the results of the data. These conditions can be applied if the output data needs to be filtered based on one or a group of conditions. This allows users to retrieve only the selected data in the output.
-
Just like parameters, conditions need to be created first using the “Add Condition” button, and then they can be used within the join conditions.
-
Once we click on “Add Condition,” it will display the “Create Condition” window as shown in the image below.
9. Detail view.
-
The list view displays a total list of datasets when the
Typeis selected asDatasetand shows a list of tables and views if theTypeis selected asTables & Views. -
From here user can drag and drop the required dataset, tables, or views into the Pipeline Grid window.
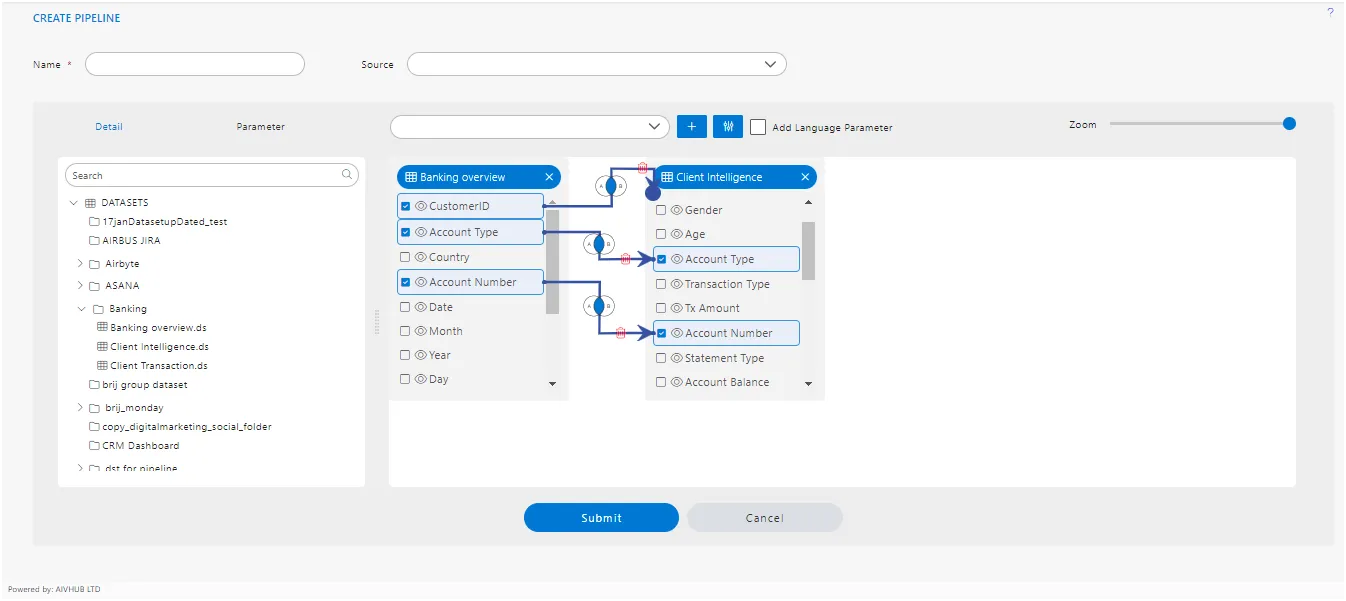
10. Pipeline Grid Playground.
-
All the join and logic building operations on tables, views, or datasets will be performed in this Playground.
-
User just needs to select the dataset, table, or view and drag it into this playground to proceed further.
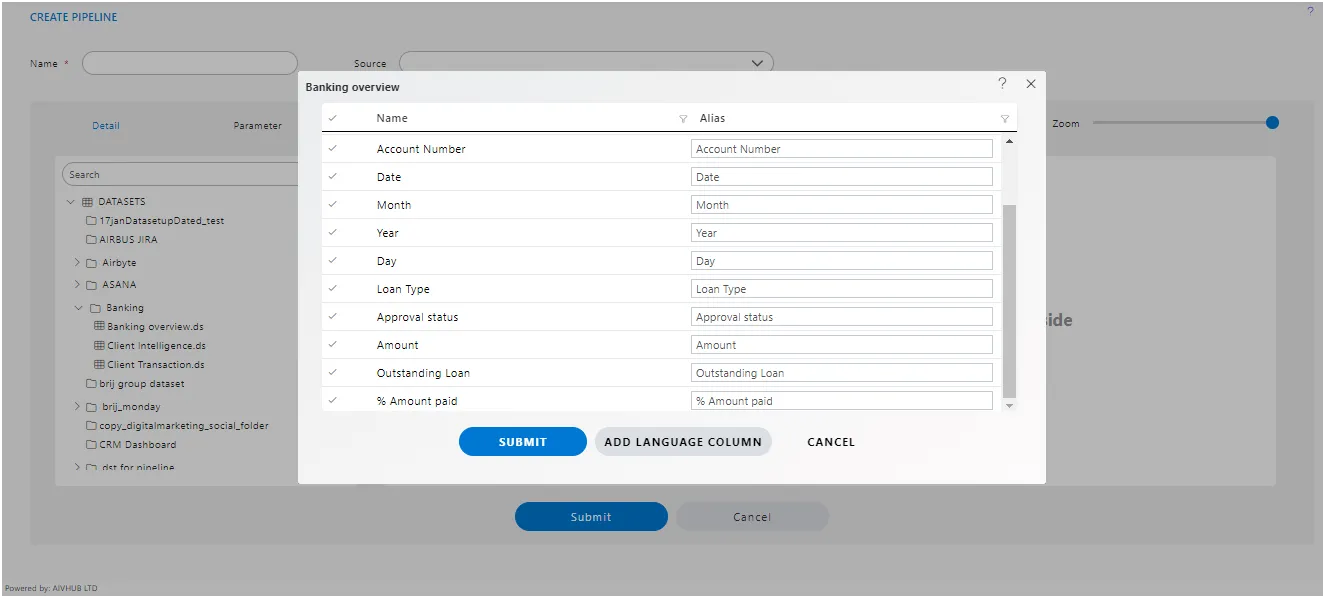
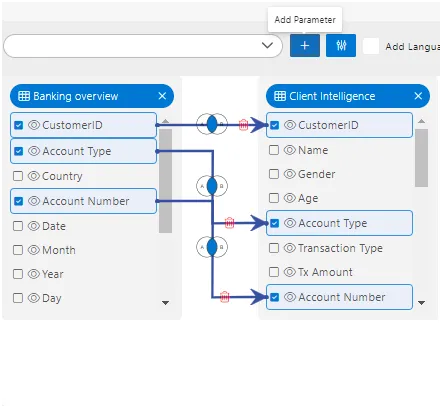
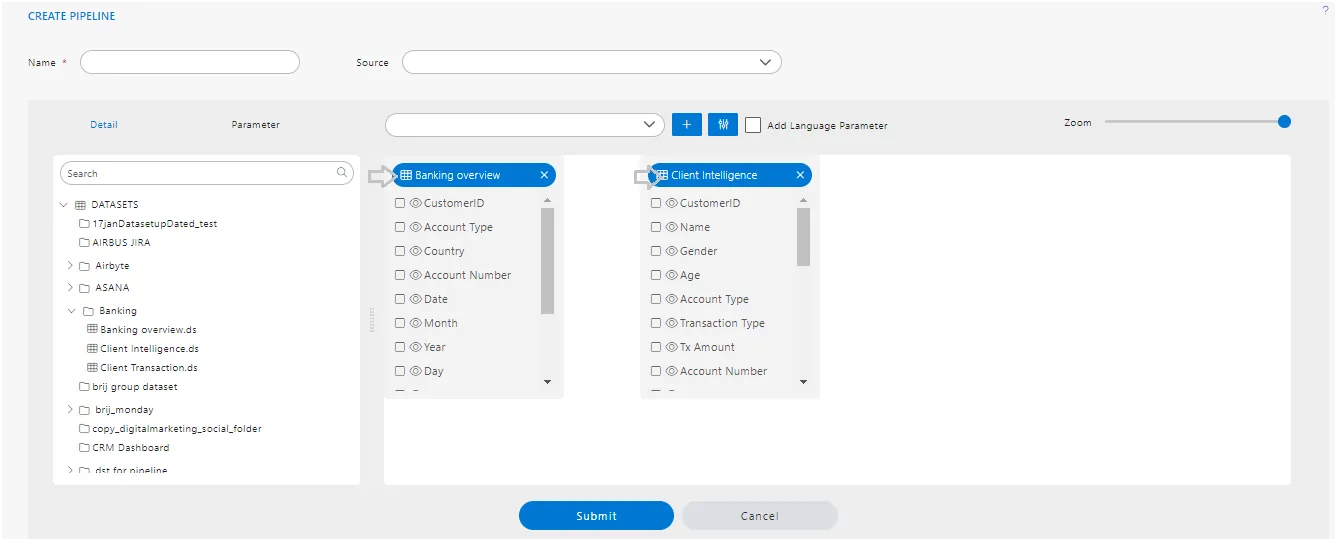
Node
- When users drag and drop datasets, tables, or views inside this playground, a list of columns available in the selected dataset, table, or view will be displayed. Simply select the required fields and click on “Submit”.
- You can see the table or dataset name displayed on the top left side of the column list window.
-
After clicking on the submit button, a box will be added to the Playground, which is what we call a Node.
-
Similarly, the user can add as many nodes as they want in this playground with just the drag and drop function.
11. Zoom in and Out.
- In the AIV pipeline dataset creation interface, users can zoom in and out to adjust the view of the pipeline. This functionality is typically facilitated by a slider or buttons that allow users to increase or decrease the magnification level of the pipeline diagram. By zooming in, users can get a closer look at the details of the pipeline nodes and connections, while zooming out provides a broader overview of the entire pipeline. This feature helps users to navigate and manage pipelines more effectively, especially when dealing with complex data processing workflows.
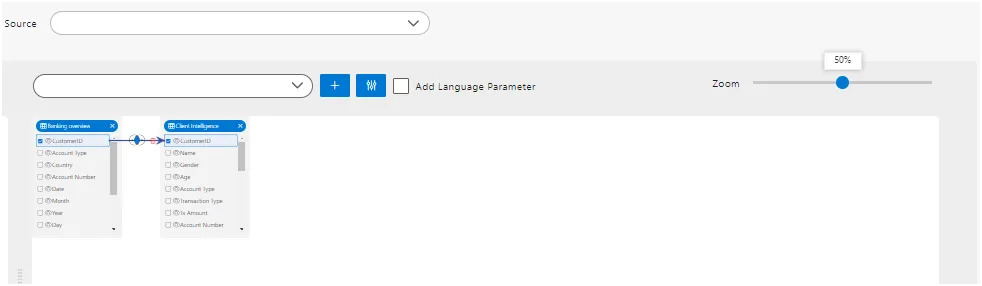
- The slider can be useful when there are many nodes added to the playground, allowing the user to check the linking with different nodes in a single view.
12. Submit and Cancel.
- On the Pipeline Dataset in AIV, the “Submit” button is used to save the changes or configurations made to the pipeline, whereas the “Cancel” button is used to discard any modifications and revert to the previous state or close the pipeline creation window without saving the changes.