How to Upload Files to AIV Using API Token and Postman
Introduction
The AIV File Upload API allows you to upload files securely to AIV using an API Token and tools like Postman.
This method is useful for automation, backend integrations, and manual uploads without logging in to the AIV interface.
This guide covers:
- Generating an API Token in AIV
- Configuring Postman for uploads
- Understanding API responses
Key Highlights
-
Token-Based Authentication:
Securely upload files using an API token — no manual login required. -
Flexible Upload Options:
Choose upload paths, visibility, and replace options directly via API. -
Automation Ready:
Perfect for integrating with backend systems or scheduled data uploads. -
Detailed Response:
Understand both success and failure responses for debugging.
Part 1: Generate an API Token in AIV
Before uploading files, you must generate an API token within AIV.
Step 1: Log in to AIV
- Go to AIV Login Page and log in using your credentials.
- Once logged in, you will be redirected to the AIV Home Page.
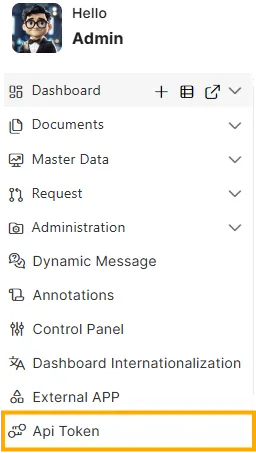
Step 2: Navigate to the API Token Section
-
Click the
 menu in the top-left corner.
 -
Select API Token.
-
The Token Management interface will open.

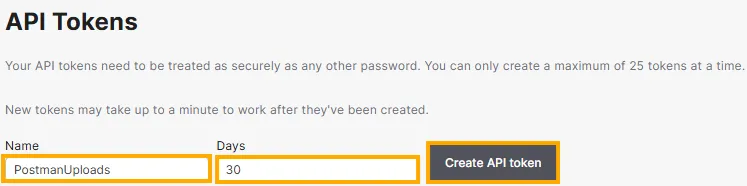
Step 3: Create a New API Token
-
You will see a list of your existing tokens (if any).
-
Fill in the following fields:
Field Description Example Name Descriptive token name PostmanUploadsDays Duration for token validity 30 -
Click the Create API Token button.
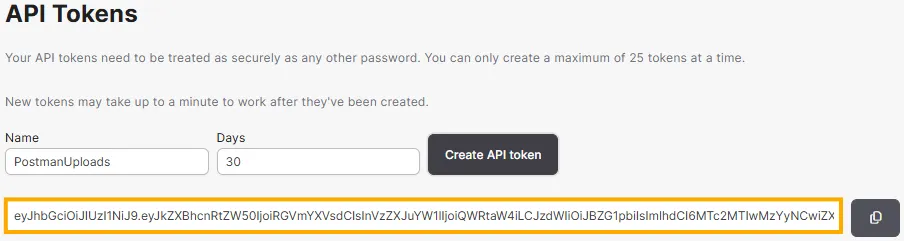
Step 4: Copy Your Token
-
After creating the token, a dialog box will appear displaying the newly generated token.
-
Copy the token immediately and store it in a secure location.
Part 2: Upload a File to AIV Using Postman
After obtaining your API token, use Postman to upload a file to AIV.
Step 1: Set Up the API Request
- Open Postman and create a new request.
- Set the Method to
POST. - Enter the URL:
https://aiv.test.oneaiv.com:8086/aiv/file_upload_servletStep 2: Configure Request Headers
In the Headers tab, add:
| Key | Value |
|---|---|
apitoken | eyJhbciOiJiJ9... (your API token) |
Step 3: Configure the Request Body
- Go to the Body tab.
- Select form-data.
- Add the following key-value pairs:
| Key | Type | Example Value | Required |
|---|---|---|---|
file | File | worldcities.xlsx | ✅ |
uploadCategory | Text | RESOURCES | ✅ |
myArray | Text | (optional) | ❌ |
userArray | Text | (optional) | ❌ |
uploadPath | Text | /brijesh | ✅ |
visibilityType | Text | PVT | ✅ |
replaceFlag | Text | true | ✅ |
copyDefaultPriv | Text | true | ✅ |
description | Text | (optional) | ❌ |
📁 For the file field, click Choose Files in Postman to upload from your system.
Step 4: Send the Request
- After setting the headers and body, click Send.
- If successful, your file will upload to the specified path in AIV.
Part 3: Understanding the API Response
✅ Success Response
If the upload is successful, AIV returns a 200 OK response:
{
  "status": "success",
  "message": "File uploaded successfully",
  "filePath": "/brijesh/worldcities.xlsx"
}
❌ Failure Response
If something goes wrong (e.g., invalid token or missing parameters):
{
  "status": "error",
  "message": "Invalid apitoken or missing parameters"
}
Troubleshooting
| Issue | Possible Cause | Solution |
|---|---|---|
| 401 Unauthorized | Invalid or expired token | Generate a new API Token. |
| 400 Bad Request | Missing or incorrect form-data keys | Verify all required parameters are included. |
| 500 Server Error | Temporary server issue | Retry or contact AIV support. |
Summary
Uploading files via AIV API using Postman provides a secure, efficient, and automated way to add data to your AIV environment.
By leveraging API tokens, you can integrate AIV uploads into scripts, backend workflows, or third-party tools without manual login — ensuring a seamless and reliable experience.