Schedule Reports by Time - Recurring
The Schedule Reports by Time – Recurring feature allows you to execute a report multiple times according to a defined schedule — such as daily, weekly, monthly, yearly, or by using an advanced expression.
This document explains how to configure and execute reports using the Recurring scheduling option.
Recurring : This video explains Schedule Reports by Time - Right Now within the application.
Objective
To schedule and execute a report repeatedly at defined intervals using the Recurring scheduling option.
Prerequisites
-
For this example, the report used is Order details.rptdesign.
-
Download the required sample files from the link report.zip
-
Upload Order details.rptdesign to the Report Section under the Root folder.
-
Refer to this link for detailed steps on uploading files in the application.
Steps to Schedule a Report using the Recurring Option
-
We will be using Order Details Report in this example.
-
There are two ways to open a report for scheduling:
I. By clicking on the desired output format option (for example: rptdocument, XLSX, DOCX, PDF, etc.) as shown in the image below.

These icons allow you to directly schedule the report in the selected format .
II. By double-clicking on the desired report name to open it for scheduling.
-
After opening the Order Details Report, the Parameter Tab will open by default.
-
Parameter Tab
- Use the Parameter Tab to provide the required input values for generating the report.
- Parameters marked with an asterisk (*) are mandatory.
- After entering all parameters, click on the Schedule Tab.
-
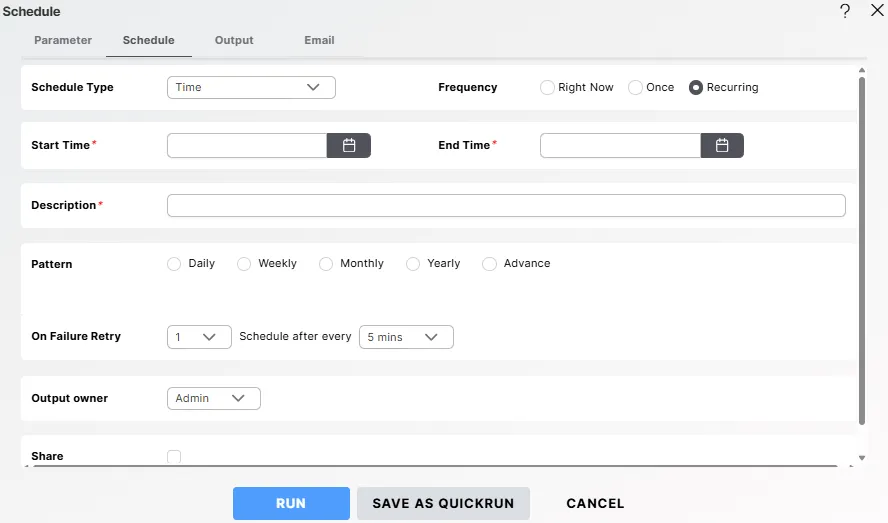
Schedule Tab
In the Schedule Tab, you define how often and when the report should execute.
Steps to Configure the Schedule Tab:
I. Schedule Type – Select Time from the dropdown list to schedule the report based on a time condition.
II. Frequency – Choose Recurring from the available options (Right Now, Once, Recurring).
- This allows you to define a repeating pattern for report execution (Daily, Weekly, Monthly, etc.).
III. Start Time* – Select the date and time from which the recurrence should begin.
IV. End Time* – Define the date and time when recurrence should stop.
V. Description* – Enter a short description to identify this recurring schedule.
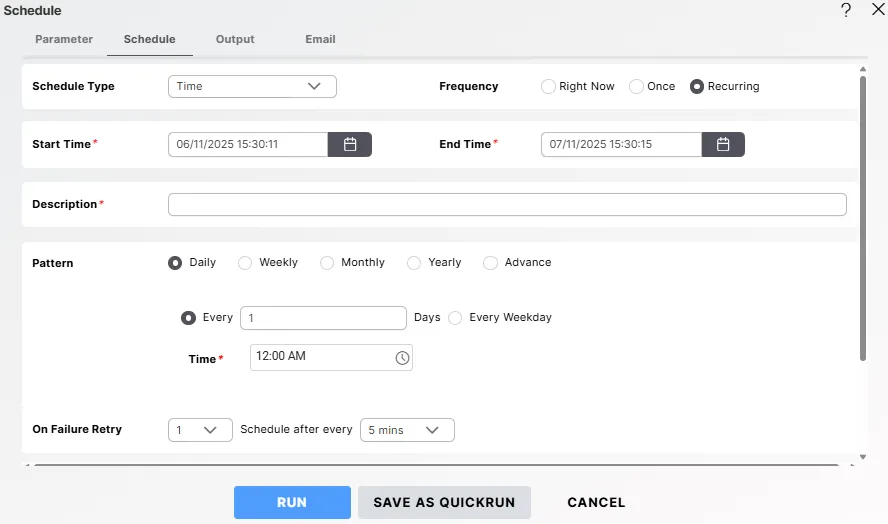
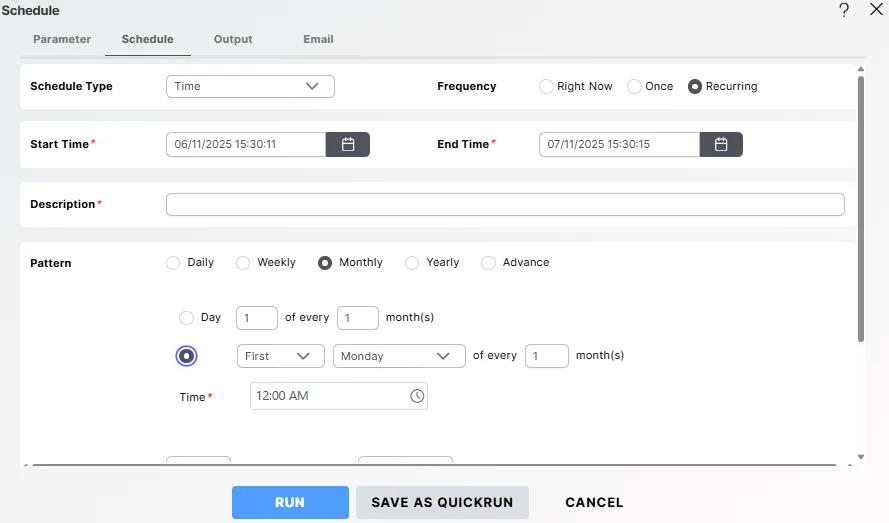
Recurrence Patterns
You can configure how frequently the report repeats using one of the following patterns:
I. Daily – Allows you to schedule the report at a specific time, either every n days (e.g., once every 2 days — runs, skips a day, then runs again) or on weekdays only (Monday to Friday).
II. Weekly – Allows you to schedule the report to run at a specific time on selected days of the week (e.g., Monday, Wednesday, and Friday).

III. Monthly – Allows you to schedule the report to run every n months at a specified time. You can choose to run it on a specific calendar date (e.g., the 1st of every 2 months) or according to a weekday rule (e.g., the first Monday of every 2 months). For instance, with a 2-month interval, the report runs once, skips the next month, and runs again in the month after.
IV. Yearly – Allows you to schedule the report to run annually at a specified time on either a fixed date (e.g., January 1st) or according to a weekday rule within a month (e.g., the first Monday of February).
V. Advanced – Use advanced cron-style expressions to create custom scheduling patterns.
Click the help icon (?) beside the field for syntax guidance.
On Failure Retry
Define the retry mechanism in case the recurring report fails to execute.
- Retry Count – Number of times the system should retry if execution fails (for example: 1, 2, or 3 times).
- Schedule After Every – Time interval between retries (for example: 5 mins, 10 mins, etc.).
- This ensures automatic retrying in case of temporary system or network errors.
Output Owner
- Displays or allows you to select the user who will own the generated report (for example: Admin).
- The scheduled report will appear under this user’s scheduled outputs in the system.
Share
Enable this checkbox if you want to share the recurring schedule with other users or roles.
Once checked, additional configuration options appear as shown below.
I. Users / Roles – Select whether you want to share the report with specific Users or Roles.
II. Search User – Use this field to quickly find a specific user by name.
III. Visibility – Set the visibility level for the scheduled report:
- Private – Visible only to you.
- Public – Visible to all users.
- Internal – Visible only to selected users or roles.
IV. Available Users – Displays all users in the system.
- You can select one or more users by checking the boxes beside their names.
V. Selected – Displays the list of users or roles who will have access to this scheduled report.
After configuring all these settings, click on the Output Tab.
-
Output Tab
- Use the Output Tab to define the report’s output format, file name, and storage location.
- For example, you can generate the report in PDF, XLSX, or DOCX format.
- You can also define post-processing actions, such as sending output to a folder or triggering an event.
-
Email Tab
- Use the Email Tab to configure recipients, subject, and attachments for the automatic delivery of the generated report.
-
Final Execution
After configuring all required tabs (Parameter, Schedule, Output, and Email), you are ready to execute or save the scheduled report.
At the bottom of the scheduling window, the following buttons are available:
Button Description RUN Executes and activates the recurring schedule according to your configuration. SAVE AS QUICKRUN Saves the current setup for quick future execution. CANCEL Cancels the scheduling process and closes the window. 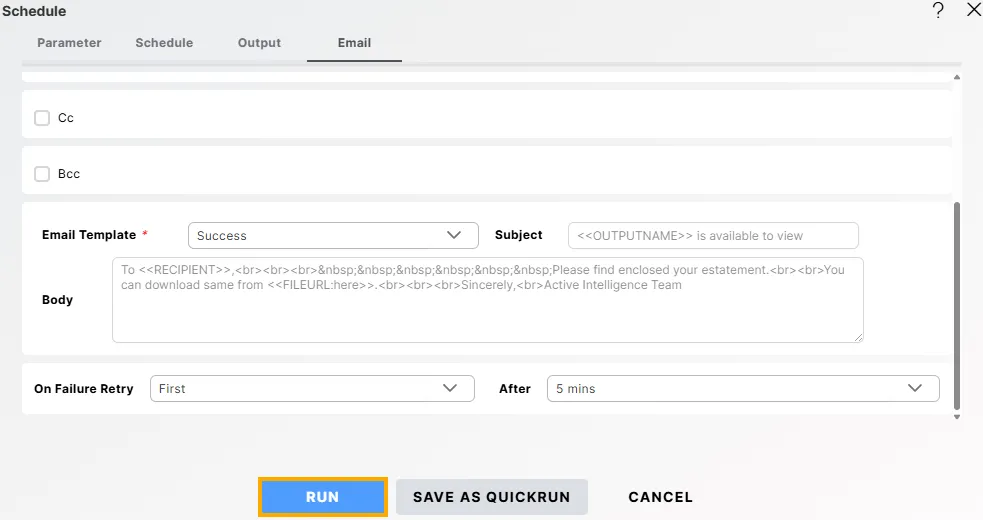
- When you click RUN, the recurring report will be activated and will execute automatically according to the configured pattern.
- Once executed, you can verify its status and results in the Request section of the application.
-
Monitor Execution Status
- The Request section displays all reports that are Completed, Running, Failed, or Scheduled.
- You can monitor the execution progress, output, and retry attempts.
- If a failure occurs, the error message or reason for failure will be displayed for troubleshooting.